Daisy
daisy is the rover equipped with the highest number of sensors.

- Pioneer 3-AT
- Primary controller: Jetson TK1, hostname
daisy- Jetson TK1 UART2 is connected to the Pioneer’s microcontroller running
P2OS. The serial port for the P2OS connection is
/dev/ttyTHS1. - ROS Indigo
for ARM is installed. ROS packages:
ros-indigo-p2os-driver(p2os)ros-indigo-driver-common,ros-indigo-hokuyo-node.
- Jetson TK1 UART2 is connected to the Pioneer’s microcontroller running
P2OS. The serial port for the P2OS connection is
- Aux 1: Raspberry Pi
daisy-pi - Aux 2: Hokuyo laser rangefinder
- Secondary controller: Raspberry Pi, hostname
daisy-pi- Ubuntu Mate
- ROS Kinetic for ARM.
Network Setup
Please do not change the basic networking settings (several students and employees use the rovers). However, you can propose and implement better solutions in consultation with Denise.
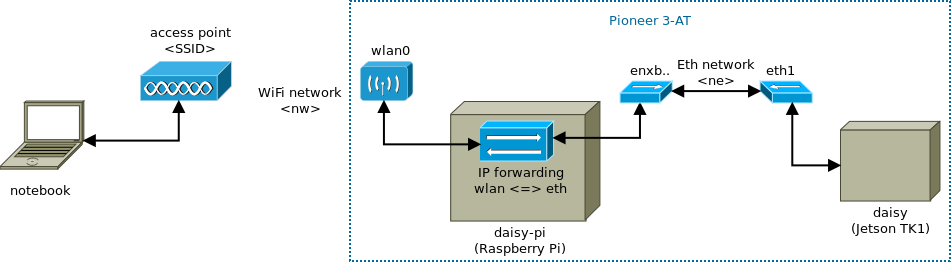
The Raspberry Pi daisy-pi automatically connects to the access point <SSID>
over its interface wlan0 when available and is the gateway of the Jetson
TK1. Denise manages the accounts and connection details (SSID, IPs, username
and password) -> contact for account creation.
A router provides an access point for convinience. However, you can also setup a hotspot with the appropriate SSID and password.
To use daisy in a convenient way (with ROS launch files), follow the instructions of
the rover network setup on the example of
dagobert. You can test the network setup with following command (replace
your-notebook with the hostname of your PC):
$ roslaunch pioneer_teleop drive.launch \
    notebook:=your-notebook robot:=daisy \
    robot-distro:=indigo robot-port:=/dev/ttyTHS1
Reach daisy
Jetson TK1 daisy uses its Ethernet port to communicate to the Raspberry Pi
daisy-pi. The Jetson TK1 is therefore in a different network <ne> than the
notebook <nw>.
IP forwarding must be enabled for
the Pi’s Ethernet port eth to wlan0, which is performed by a script at
startup. On the Jetson TK1
set the route to the
WLAN network <nw>. And vice versa for the notebook (route to Jetson TK1).
Additionally to the settings below, daisy, daisy-pi and your notebook need
appropriate host name entries in /etc/hosts mapping the name to the IP.
Settings on daisy
Network settings in /etc/network/interfaces:
auto eth1
iface eth1 inet static
  address <ne-daisy-ip>
  netmask 255.255.255.0
  gateway <ne-daisy-pi-ip>
  dns-nameservers 8.8.8.8 8.8.4.4

# Static route
up route add -net <nw-base-ip> netmask 255.255.255.0 gw <ne-diasy-pi-ip>
Settings on daisy-pi
Network settings in /etc/network/interfaces:
# Connection to Jetson TK1
auto enxb827eb4e5821
iface enxb827eb4e5821 inet static
  address <ne-daisy-pi-ip>
  netmask 255.255.255.0
Script for IP forwarding:
#!/bin/sh
# enable ip forwarding
sudo sysctl -w net.ipv4.ip_forward=1
# forward packets from eth to wlan
sudo iptables -A FORWARD --in-interface enxb827eb4e5821 -j ACCEPT
sudo iptables --table nat -A POSTROUTING --out-interface wlan0 -j MASQUERADE
Added following snippet to /etc/rc.local:
# ip forwarding
/home/pi/forward_eth_to_wlan.sh &
echo "start ip forwarding: eth -> wlan"
The WiFi connection to the access point is setup via the GUI.
Settings on your-notebook
Connect to the access point (router), enter the password and configure it as
follows: (unused) static IP for your notebook, netmask 255.255.255.0, the
gateway <nw-daisy-pi-ip>, DNS (e.g., 8.8.8.8), and the route to daisy
(address <ne-base-ip>, netmask 255.255.255.0, gateway <nw-daisy-pi-ip>).
When you want to use a hotspot on your notebook, check out the tutorial on how to setup a hotspot for Daisy.
Jetson TK1 Installation
- Linux for Tegra R21.5 sample file system (follow the quick start guide). However, next time I would try the Grinch kernel directly due to missing drivers in the sample file system (FTDI, WiFi adapter).
- An additional power button (switch) is installed. (When Linux is shutdown, power on is only possible via the button due to a capacitance somewhere at the power supply.)
- Installed driver for WLAN stick.
- Installed UART2 including level shifter and MAX3232 (see also GPS example). Note, the visible serial port is just for the serial console.
- Automatically connects to access point
<SSID>. - Changed hostname (
/etc/hosts,/etc/hostname) - Installed
openssh-server. - Enabled IP forwarding and installed IP routes on Pi and notebook.
Applications using Daisy
Tutorials
- Tracking Daisy
- Run ROS with Docker
- Setup a hotspot for Daisy
Repositories
- ROS drivers for Daisy’s sensors are part of the general-ros-modules package
- Daisy’s Status on a Nokia 5110 LCD
- Demos using Daisy (e.g., optitrack, state estimation, wanderer)
- A generic sensor fusion package was developed for and tested on Daisy
- A self-healing package is demonstrated with Daisy
2019-02-06 | Denise Ratasich